Mastectomy Modified Radical Breast Surgery PreOp® PostCare Patient Education
Hellow guys, Welcome to Utubetrends, and you are watching Mastectomy Modified Radical Breast Surgery PreOp® PostCare Patient Education. and this vIdeo is uploaded by PreOp.com Patient Engagement - Patient Education at 2010-09-30T12:26:29-07:00. We are pramote this video only for entertainment and educational perpose only. So, I hop you like our website.
Info About This Video
| Name |
Mastectomy Modified Radical Breast Surgery PreOp® PostCare Patient Education |
| Video Uploader |
Video From PreOp.com Patient Engagement - Patient Education |
| Upload Date |
This Video Uploaded At 30-09-2010 19:26:29 |
| Video Discription |
http://www.PreOp.com -or- http://bit.ly/PreOpFacebook -or- http://bit.ly/PreOpTwitter - Patient Education -
Patient Education Company
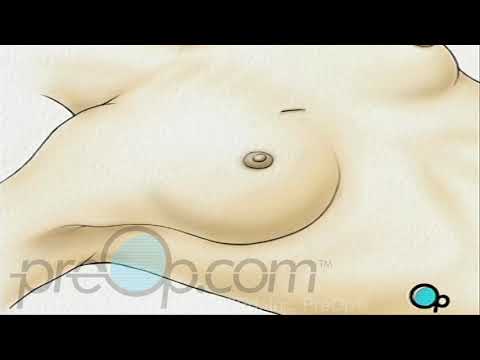
Your doctor has recommended that you have a modified radical mastectomy. But what does that actually mean?
Traditionally, a Radical Mastectomy called for the removal of the breast, surrounding tissue and even the chest muscle below.
A Modified Radical Mastectomy is a procedure in which the breast and surrounding tissue are removed, while leaving the chest muscle intact. In most cases, mastectomy is required in order to remove cancerous tissue from the body. The extent of tissue removed is determined by the amount of cancer present in your body.
A Modified Radical Mastectomy is one the most extensive forms of breast cancer surgery in that it calls for the complete removal not only of the breast, but of the lymph nodes as well.
Lymph nodes are small junctions that join the vessels that make up the lymphatic system. The lymphatic system circulates a bodily fluid called lymph in the same way that the circulatory system carries blood.
Your doctor has recommended that you undergo a modified radical mastectomy because the cancer in your breast may have begun to move into the lymph nodes under your arm as well as into your chest muscle.
This procedure will permanently change the outward shape and appearance of your chest.
So make sure that you ask your doctor to carefully explain the reasons behind this recommendation.
Patient Education Company
Germs are present always on your hands and they can be transferred to:
* other parts of your own body,
* to the family member for whom you are caring
* your patient
* and to any clean object that you touch.
By washing your hands correctly:
* you remove germs from your hands.
* Handwashing is the single most important way you can prevent infection from occurring and
* prevent the spread of infection.
You must carefully wash and dry your hands:
* Before and after each time you care for your family member or your patient.
* Before and after you handle your patient's and your own food and drink.
* Before and after you manipulate any contact lenses.
* Before you apply and after you remove gloves
Patient Education Company
* After you use the toilet.
* After you cough, sneeze or blow your nose.
* After contact with anything that could be soiled or have germs on it.
* After you pick up any object from the floor
* Handwashing takes a minimum of 10-15 seconds,
* longer if your hands are soiled.
* The longer you wash, the more germs are removed.
Patient Education Company
Your correct use of disposable, non-sterile gloves
* helps prevent the spread of infection and
* protects both you, the caregiver, and
* the person receiving care, your patient.
The gloves used most often are made of latex, are powder-free and are easy to put on and take off. They are used once only and then discarded.
Gloves are not worn all the time when giving care. Touching your patient with bare hands:
* shows love and respect,
* sends a message of caring and acceptance,
* and provides comfort.
Gloves should always be worn if contact is likely to occur with:
* blood
* body fluids
* excretions such as urine or feces
* mucous membranes such as in the mouth or genitalia
* or non-intact skin.
Patient Education Company
Before you put gloves on, carefully wash and dry your hands.
Carefully, wash and dry your hands.
Put on your gloves.
The first step is to remove the old dressing
Loosen the edges of the tapes and peel the tapes off the skin by pulling them towards the wound,
keeping the skin taut with the other hand
Lift the tapes and the dressing off together. Note any odor and the color of any drainage on the dressing.
Discard the dressing and tapes into the plastic bag
If the dressing sticks to the wound, pour a little cleansing solution onto the dressing and let it sit for a minute.
Gently pull the dressing off, keeping the skin taut above the wound
Look carefully at the wound. Any of the following should be reported immediately to your doctor or nurse:
* redness of the wound or surrounding skin
* drainage from the wound, particularly if it's yellow and smells
* any bleeding
* swelling of the skin around the wound
* separation of the edges of a sutured wound
* or maceration, a waterlogged appearance of the edges of the wound.
Pour some cleansing solution onto a small gauze pad, squeeze out the surplus solution and,
...with one stroke, clean the wound from top to bottom. Discard the gauze pad into the plastic bag.
Using a fresh gauze pad with cleansing solution for each stroke, |
| Category |
Education |
| Tags |
Patient | Education | Mastectomy | nipple | breast | lymph | surgery | clinic | hospital | doctor | medicine | pharma | cancer | tissue | prosthetics | foundation | bra | walk | tutorial | health | educational | AARP | HIMSS | SXSW | ANCC MAGNET | ANCC certification | JCAHO | HCIC | HIMSS14 | Engagement |
More Videos